Monday, March 28, 2011

A+ Avocados

One of the food items I was most surprised to read as a suggestion for baby's first food was avocado. I haven't seen jarred avocado in the baby food aisle and have never seen another baby eat one so it was quite a surprise. But according to all the information I read, it is a great first introduction food because it is easy on the baby's stomach and doesn't tend to cause any type of adverse reactions. I was also really excited to put it in Rex's rotation because both Forrest and I are avocado junkies (we even visited an avocado farm during a vacation to Central California and posed with the trees for pictures as if they were celebrities) and I thought it would be cool for him to indulge when we do.

Well unfortunately Rex hated the fatty fruit. He acted as if we were putting chunks of poison in his mouth and he gagged and coughed violently until we got the message and stopped shoveling the green goopey spoonfuls into his mouth. We were disappointed to say the least. How could he not take to our beloved avocado? We still aren't sure, but we do know he wasn't as excited to be eating it as we were to be serving it to him. We will try again though since we aren't willing to accept the fact just yet that he doesn't share our avocado affinity.

It wasn't all disappointment though in the avocado department that evening, because there was one positive outcome. Although Rex didn't like his portion, we certainly did. Below is the recipe we made with our avocados that night and it was sinfully indulgent! The dressing doesn't seem like much while you are making it especially since it is made up of mostly water, but it is perfection. And paired with the mono-seeded fruit, it is divine!

Avocados with Warm Bacon Parsley Vinaigrette
Adapted from Sunset April 2009

Ingredients
  • 1/3 pound thin-sliced bacon
  • 2 firm-ripe avocados, each pitted, peeled, and cut into 4 to 6 wedges
  • 3 garlic cloves, minced
  • 2 tablespoons fresh lemon juice
  • 1 teaspoon sugar
  • Kosher salt
  • Freshly ground black pepper
  • 2 tablespoons chopped flat-leaf Italian parsley
Preparation

1. Cook bacon in a large frying pan over medium-low heat until crisp.

Drain on paper towels; let cool. Remove pan from heat and discard all but 2 tbsp. bacon fat. Divide avocado wedges among 4 plates.

2. Heat reserved bacon fat over medium heat. Add garlic, 1/4 cup water, the lemon juice, and sugar and simmer 1 minute, stirring.

Season with salt and pepper. Stir in parsley

and crumble in bacon.

Stir to incorporate.

Immediately pour over avocado wedges and serve.

Click Here for My Adapted Printable Recipe

Thursday, March 24, 2011

To Take-Out or Not To Take-Out?

We eat out or order take-out pretty frequently lately. But one thing we never order is Chinese food. It is just too easy to make at home and it always tastes fresher, lighter and less greasy than if we had it delivered. If you are craving Chinese take-out, there is no reason to ever order another dish known by its corresponding number. This was a super simple solution to chop stick cuisine.

Shrimp and Broccoli Stir Fry
Adapted from Cooking Light January 2008

Ingredients
  • 1/4 cup fat-free, less-sodium chicken broth
  • 2 tablespoons rice vinegar
  • 2 tablespoons low-sodium soy sauce
  • 2 teaspoons cornstarch
  • 1/2 teaspoon dark sesame oil
  • 1/4 teaspoon crushed red pepper
  • 1 tablespoon canola oil, divided
  • 1 tablespoon minced peeled fresh ginger
  • 1 tablespoon minced fresh garlic
  • 1 pound peeled and deveined large shrimp
  • 1/4 teaspoon salt
  • 4 cups small broccoli florets
  • 1 cup vertically sliced sweet onion
Preparation

Combine first 6 ingredients in a small bowl, stirring with a whisk.

Sprinkle shrimp with salt. Heat 2 teaspoons canola oil in a large nonstick skillet over medium-high heat. Add ginger and garlic to pan; stir-fry 30 seconds.

Add shrimp to pan, and stir-fry 3 minutes or until done.

Remove shrimp mixture from the pan.

Add remaining 1 teaspoon canola oil to pan. Add broccoli and onion to pan; stir-fry 6 minutes or until broccoli is crisp-tender.

Add shrimp mixture and broth mixture to pan;

cook 1 minute or until thickened, stirring constantly.

Serve over brown rice or soba noodles.

Click Here for My Adapted Printable Recipe

Tuesday, March 22, 2011

How to Make Homemade Baby Food

I love to cook and I especially love to cook for the people I love. I take pride in spending time picking out the perfect recipes, shopping for quality ingredients, carefully preparing each dish and deciding on the perfect presentation. It is so rewarding after all of the aforementioned effort to see the faces of my loved ones as they taste my meals and to hear their praise and appreciation. There is nothing better.

With all that being said, I couldn't wait to cook for my baby. I know I have years of making meals for him, packing his lunch and deciding on snacks so I tried not to rush the process. After all - I was "making" his food for the last five months anyway, just not in the kitchen ;-) But when the time came to start Rex on solids I knew there was no way I would be popping a metal top to that glass jarred baby mush anytime soon.

I researched safe first foods for babies and I set off to prepare my baby's first "meal". I couldn't have been more excited to see his reaction. And as it normally goes with babies, it was priceless. Unsure at first, in love by bite #5. It was a success and I was one proud mommy chef!


Homemade Baby Food (Sweet Potatoes)


Ingredients:

  • 1 large sweet potato
Directions:

1. Preheat oven to 400 degrees. Wash sweet potato thoroughly under running water using a clean kitchen towel.

2. Poke holes in the sweet potato using a fork.

3. Wrap sweet potato in aluminum foil and place in a square baking dish.

4. Bake for 60 minutes for a large sweet potato and 40 minutes for a small sweet potato.

5. Remove from the oven and let cool.

6. Peel the skin from the sweet potato and cut out any brown spots.

7. Add about an ounce of formula or breast milk to the sweet potato meat.

8. Puree using an immersion blender, drink blender or food processor.

9. Serve to your precious baby.

Wednesday, March 16, 2011

Tweet me in the Middle

It's true, in the past year I haven't blogged as often as I used to. I used to crank out 3-4 posts/recipes a week. Then I got pregnant and was too tired to cook/blog that often, then I moved in with my mother-in-law and I didn't have to cook (Thanks Mrs. Pat), then we got our own house and I thought things would crank up again, then we had a baby and I was too busy to cook/blog that often. Each one of my posts take a considerable amount of time between photo editing, recipe adaptation, printable document creation and the actual composition of the accompanying story/explanation that starts each post. It just isn't feasible in my current lifestyle to make that happen more than once or twice a week at best.

But just because I can't blog as often as I used to, it doesn't mean that I am any less devoted to this blog, food or eating. All three are still a big part of my life and I hope one day I can resume my posting frequency as soon as my life calms down a bit. But in the meantime I have decided to create a Twitter account to keep you up to date on all things "food" in my life. Just because I am not blogging four times a week doesn't mean I am not still cooking, eating and thinking about food.

One benefit of this blog is that I had roughly 2 years of recipes under my belt before I moved home to be with my family and before we had a baby. That experience in the kitchen afforded me the luxury of many recipe options. I always have a past blog recipe in mind when I need to bring something to a get together or when I am looking for a go to dinner. Blogging four times a week like I did in the past pretty much meant No Repeats. Even if something was delicious, there just wasn't time in the week to make something we already tried if I had to create four new recipes/blog post in only seven days. So now that I am not blogging as often, we have been able to go back and visit some of the fabulous dishes I made before.

These are the types of things I will let you know about via my Tweets. I plan to keep you abreast to old recipe redos, favorite restaurants, ingredient searches and sometimes just plain old boring day to day food musings.

So, click this link if you want to follow me @ElizEdibExp. If getting your own Twitter account isn't your thing but you are still interested in what I am up to, you can view my last few Tweets on the side bar of my blog home page. But it will be beneficial to follow me, because in about a month I am going to have a fun giveaway for all of my followers.


Monday, March 14, 2011

Restful Rice

I love this recipe for more reasons than its flavor. I loved this recipe before I even tasted it because of its method of preparation for the rice. Although I cook often and have tried my hand at several cooking techniques and believe I have triumphed over many of them, one thing I have not excelled in is rice preparation. I am never satisfied with the way my stove top rice turns out. It is either too crunchy or too mushy or too wet. That is why when I found this recipe I was fired up to give it a try. I didn't have to boil rice on the stove to enjoy the groovy grain. This rice was perfectly cooked. It was a perfect texture coupled with the fabulous flavor of the dish. This recipe is a definite winner!

Chicken and Rice
Adapted from Cooking Light October 2010

Ingredients
  • 1 tablespoon olive oil
  • 8 bone-in chicken thighs, skinned
  • 3/4 teaspoon salt
  • 1/4 teaspoon ground black pepper
  • 2 cups chopped onion
  • 1 carrot, thinly sliced
  • 8 ounces cremini mushrooms, sliced
  • 4 garlic cloves, minced
  • 1 cup long-grain white rice
  • Cooking spray
  • 1 cup fat-free, lower-sodium chicken broth
  • 1/4 cup water
  • 4 tablespoons heavy whipping cream
  • 2/3 cup (1 1/2 ounces) grated fresh Pecorino Romano cheese
Preparation

1. Preheat oven to 350°.

2. Heat oil in a skillet over medium-high heat. Sprinkle chicken with salt and pepper. Add 4 chicken thighs to pan;

sauté 3 minutes on each side or until browned. Remove chicken from pan. Repeat with remaining chicken. Place chicken on a plate on the side.

3. Add onion and carrot to pan; sauté 4 minutes.

Add mushrooms; sauté 5 minutes.

Add garlic; sauté 1 minute, stirring constantly.

Add rice; sauté 1 minute.

Spoon rice mixture into a 13 x 9-inch glass baking dish coated with cooking spray;

stir in broth, 1/4 cup water,

and cream.

Arrange chicken over rice mixture;

sprinkle with cheese.

Bake at 350° for 45 minutes or until chicken is done.

Click Here for My Adapted Printable Recipe

Tuesday, March 8, 2011

Happy Mardi Gras 2011

Happy Mardi Gras! This is the latest sweet treat I made for Rex's daycare teachers as a special thank you for taking care of my precious little boy. I knew that this particular holiday treat needed to make a statement and be very unique. What else would you expect from a little baby named Rex?

These were a cinch to make and really didn't require a recipe at all, mostly just assembly. These king cakes were worlds away from the king cake I made back in the day while residing in DC. They were no where near an all day affair.

In order to make these mini masterpieces, simply buy a can of jumbo cinnamon rolls, unroll each roll, cut in half, twist the two halves together, form into a circle and bake for 10 minutes. Ice the cakes while still hot. using the cinnamon icing. Sprinkle with purple, green and gold sprinkles. Let cool and package.

Wednesday, March 2, 2011

Newb Nib

Before we move on to the next holiday treat Rex (and his Mommy) have whipped up, I need to finish telling you about his Valentine's Day confections. The other cookie we made to place in the precious packages were Cocoa Nib Shortbreads.

The cocoa nib was an ingredient that I previously had zero experience with and to be honest had never even heard of prior to finding this recipe. When I came across the recipe and the mystery ingredient, I was instantly intrigued and had to give them a go. After some research, I found that cocoa nibs are the dry-roasted pieces of the cocoa bean that are a result of chocolate processing. Essentially, they are perfectly roasted cocoa beans separated from their husks and broken into small bits. They are the essence of chocolate. Nibs add crunchiness and subtle chocolate flavor to baked goods and savory dishes. They make a great substitute for roasted nuts or chocolate chips, without added sweetness.

Finding out what cocoa nibs were was a lot easier than actually finding cocoa nibs for purchase. I was able to find a bunch of online sellers, but came up fruitless in my search amongst the local supermarkets. Cocoa nibs are often deemed "health food" because of their high concentration of antioxidants and that fact actually led me to the right place to find this unique ingredient - Whole Foods. They weren't cheap, but alas I had everything I needed to make these bad boys.

Cocoa Nib Shortbread
Adapted from Martha Stewart Cookie iPad App

Ingredients

  • 2 cups all-purpose flour, plus more for dusting
  • 1 1/4 teaspoons salt
  • 1 cup (2 sticks) unsalted butter, softened
  • 3/4 cup confectioners' sugar
  • 1/4 cup cocoa nibs
Directions

1. Preheat oven to 350 degrees, with rack in upper third portion of the oven. Whisk to combine flour and salt.

2. In a separate bowl, beat butter with an electric mixer on medium-high speed until fluffy, about 3 minutes, scraping down side of bowl as necessary. Gradually add confectioners' sugar;

beat until pale and fluffy, about 2 minutes.

Reduce speed to low. Add flour mixture all at once, then add cocoa nibs; mix just until combined.

3. Divide dough in half, and shape into disks. Wrap each disk in plastic wrap, and chill 1 hour.
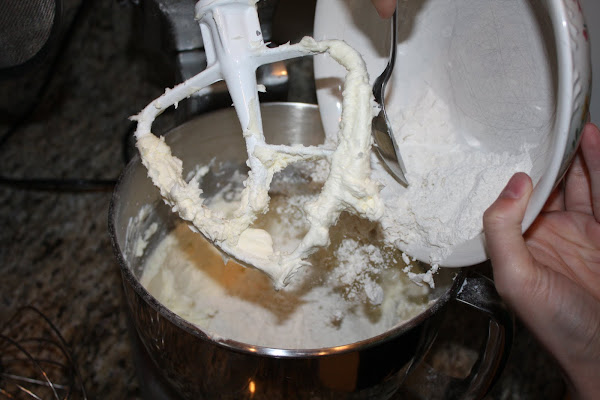
Working with 1 disk at a time, roll out dough on a lightly floured surface to 1/4 inch thickness. Using a 2-inch round cookie cutter, cut out rounds; (pardon the camouflage effect the cookies have on my counter tops, that granite should be called cocoa nib counter!)


space 1 inch apart on parchment or silicone baking mat-lined baking sheets. Chill 30 minutes.

4. Bake until golden, 22 to 25 minutes. Transfer cookies to a wire rack; let cool completely. Drizzle with melted semisweet chocolate using a fork, if desired.

Click Here for My Adapted Printable Recipe