Wednesday, December 31, 2008

Auld Lang Syne

I thought these truffles were a very sweet ending to a very sweet year! 2008 was a great year filled with exciting and memorable accomplishments. Happy New Year's Eve everyone - have a safe and happy night!

Champagne Truffles in Toasted Almonds

Makes about 3 dozen

1/2 cup heavy cream
8 ounces semisweet chocolate, coarsely chopped
1/4 cup plus 1 Tablespoon Champagne
1 tablespoon Cognac (Purchased an airplane sized bottle from a local liquor store so I didn't have to buy a whole bottle)
toasted almonds, for rolling

Bring the cream to a boil in a small saucepan over medium-high heat. Immediately pour hot cream over the chocolate in a medium bowl;

stir until smooth.

Stir in the Champagne and Cognac. (The mixture will be considerably thinner and you will need to stir for longer in order to incorporate the liquor.)

Refrigerate until chocolate mixture is firm enough to roll into balls, about 1 hour.

Using a small melon baller or ice-cream scoop, form 1-inch balls.

(Work Quickly - the chocolate is still soft and will melt if you spend too much time rolling each ball.)

Place in Freezer for 25 more minutes.

Roll each ball in chopped toasted almonds,

and transfer to rimmed baking sheets lined with parchment paper. Cover with plastic wrap, and refrigerate truffles at least 30 minutes or up to 3 days before serving.

Tuesday, December 30, 2008

Holiday Remorse

So we are finally back in DC after 6 days of skiing and 8 days of visiting New Orleans. Since December 12th we have been out of town and having a blast. Along with having a blast we have been missing the gym, indulging in rich foods and not working. Oh so much fun! But it is finally back to reality and time to get back in touch with my normal routine. I am not the type of person who can survive the battle of the bulge without watching what I eat and exercising. Time to settle down.....

As always, we returned from New Orleans with several pounds of frozen crawfish in tow. I wanted to use them immediately in my cooking, but most regional New Orleans recipes are not "healthy". I perused the internet yesterday looking for a recipe that would be considered light while incorporating my beloved mudbugs. I found exactly what I was looking for in this recipe!

Crawfish Enchiladas
Adapted from Cooking Light April 2002

1 tablespoon butter
1 cup chopped green onions
1/2 cup chopped red onion
1/4 cup chopped red bell pepper
1/4 cup chopped green bell pepper
1/4 cup chopped yellow bell pepper
1/4 cup chopped seeded jalapeño pepper
3 garlic cloves, minced
2 teaspoons all-purpose flour
1 cup 1% low-fat milk
1/2 teaspoon salt
1/2 teaspoon dried oregano
1/2 teaspoon chili powder
1/2 teaspoon paprika
1/4 teaspoon black pepper
1 cup (4 ounces) shredded reduced-fat sharp cheddar cheese
1/2 cup light sour cream
2 cups cooked crawfish tail meat (about 12 ounces)
12 (6-inch) corn tortillas
Cooking spray
1/2 cup (2 ounces) shredded Monterey Jack cheese

Melt butter in a large nonstick skillet. Add green onions, red onions, red bell pepper, green bell pepper, yellow bell pepper, jalapeno peppers and garlic;

sauté 7 minutes or until tender. Add flour to vegetables and cook 1 minute, stirring constantly.

Gradually add milk, stirring with a whisk.

Cook over medium heat until thick (about 8 minutes), stirring constantly. Stir in salt and next 4 ingredients (salt through black pepper).

Remove from heat; let stand 3 minutes. Add cheddar cheese and sour cream,

stirring until cheese melts. Stir in crawfish.

Preheat oven to 325°.

Add water to a medium skillet to a depth of 1 inch; bring to a simmer. Dip 1 tortilla in water using tongs. Slide the tortillas into the water as opposed to plopping them on top of the surface and slide them back out. If you try to pull it straight out of the water they will break. Do this step very quickly or they will break apart.

Spoon 1/4 cup crawfish mixture into the center of 1 tortilla horizontally

; roll tightly,

and place in a 13 x 9-inch baking dish coated with cooking spray. Repeat procedure with crawfish mixture and remaining tortillas. Spread remaining crawfish mixture over tortillas down the center of the roll ups and then sprinkle with Monterey Jack cheese over the entire dish.

Cover and bake at 325° for 10 minutes or until thoroughly heated.

This was the perfect dish to ease back into healthy eating. It didn't feel like we were depriving ourselves and we were able to feel full. The use of the lighter ingredients helped make this dish fairly low in calories. Dipping the tortillas in water turned them pliable for rolling, but it did not give them the flavor they would have gotten from frying. Next time I make this dish I will increase the heat a bit. I followed the recipe to the letter and it wasn't spicy at all.

Thursday, December 11, 2008

A Pound Lighter

This is my last post for about a week. Forrest and I are going skiing out West tomorrow until next Thursday. I won't be cooking - so I won't be blogging. I will promise to get some great ideas so I can hop back into the kitchen immediately upon our return. In my absence, make sure to give this cake a try.............

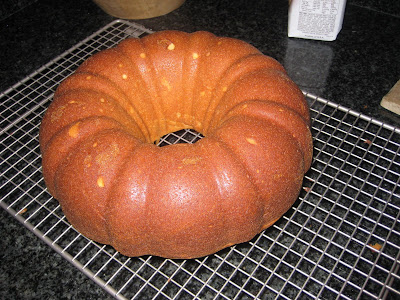
Brown Sugar Pound Cake
Adapted from Cooking Light April 2000

Ingredients
  • Cooking spray
  • 3 cups all-purpose flour
  • 1 teaspoon baking powder
  • 1/4 teaspoon salt
  • 3/4 cup butter or stick margarine, softened
  • 2 cups packed light brown sugar
  • 1 tablespoon vanilla extract
  • 3 large eggs
  • 1 cup fat-free milk
  • 1 tablespoon powdered sugar
Preparation

Preheat oven to 325°.

Coat a 12 cup Bundt Pan with cooking spray.

Lightly spoon the flour into dry measuring cups, and level with a knife. Combine flour, baking powder, and salt in a bowl; stir well with a whisk. Beat the butter in a large bowl at medium speed of a mixer until light and fluffy. Gradually add brown sugar

and vanilla,

beating until well-blended. Add eggs, 1 at a time,

beating well after each addition.

Add flour mixture to sugar mixture alternately with milk

, beating at low speed, beginning and ending with the flour mixture.

Spoon the batter into prepared pan.

Even out the top of the batter with a spatula.

Bake at 325° for 1 hour and 5 minutes or until a wooden pick inserted in the center comes out clean. Cool in pan 10 minutes on a wire rack, and remove from pan. Cool completely on a wire rack.

Sift powdered sugar over top of cake once cake is completley cooled. If you do this before the cooling process is complete, the sugar will melt.

Note: To freeze extra pound cake, let cake cool completely on a wire rack; then cut into individual slices. Remove excess air from the bag; then seal and place it in your freezer for up to four months. To thaw, let it stand at room temperature.

Note: You can use a 10-inch tube pan instead of the 12 cup Bundt pan. Just increase the oven temperature to 350º.

This cake was very yummy. The brown sugar gave the pound cake an almost caramel-like flavor. The cake was very crumbly (in a good way) and very moist. After I dusted the cake with powdered sugar I sprinkled it with some red and green decorative sugar to give the cake a little Christmas flare. I am not sure what is "light" about this cake besides the fact that it called for fat free milk, but who cares, it was delicious!

Wednesday, December 10, 2008

Pour some Sugar on me !

I have been haunted by a bag of leftover fresh cranberries sitting in my fridge since Thanksgiving. I had no idea what to do with them until I came across this recipe. I thought these little candies were so cute and seemed very easy to make. I think they would make great Christmas treats that you could package in fun little tins and give as gifts. I liked the idea of these candies because they aren't your typical chocolate Christmas candy or cookie - they are very unique. You could rest assured that you are the only one in your circle delivering sugared cranberries as Christmas treats (Being original is always important as far as I am concerned.) I also think they would be very pretty served in a small bowl next to the nuts at a cocktail party.

Sugared Cranberries
Adapted from Cooking Light December 2003

Yeild

9 servings (serving size: about 1/3 cup)

Ingredients
  • 2 cups granulated sugar
  • 2 cups water
  • 2 cups fresh cranberries
  • 3/4 cup superfine sugar (I didn't want to purchase this so I put it in a food processor and processed until superfine - this works, trust me)
Preparation

Combine granulated sugar and water in a small saucepan over low heat, stirring mixture until sugar dissolves.

Bring to a simmer; remove from heat. Do not boil or the cranberries may pop when added. Pour mixture into a bowl over cranberries.

Cover and refrigerate 8 hours or overnight.

Drain cranberries in a colander over a bowl, reserving steeping liquid, if desired. Note: You can keep the steeping liquid to make mixed drinks with.

Place superfine sugar in a shallow dish. Add the cranberries, rolling to coat with sugar. They will be very sticky, best if you transport them into the sugar using a slotted spoon or a fork.

Spread sugared cranberries in a single layer on a baking sheet; let stand at room temperature 1 hour or until dry.

Note: The steeping liquid clings to the berries and helps the sugar adhere. Store in an airtight container in a cool place for up to a week.

Sunday, December 7, 2008

Soup-er Idea

I love cooking soups, I love eating soups, and I love serving soups. I do not however , love blogging soups. They never photograph well and the delicious taste never translates into picture form. All of the yummy ingredients that are the stars of the soup normally fall to the bottom of the bowl/cup and I am left photographing a boring liquid substance.

Never one to easily accept defeat, I decide to do some research. I always research/Google any problem before I am ready to concede. Happily, I found some very clever solutions to my soup dilemma. I found a few food styling websites that suggested placing marbles at the bottom of your soup bowl in order to help raise the solid ingredients to the top of the bowl for photographing. Although this seemed like a genius answer to my problem, I wasn't willing to put marbles in my soup. Remember people - this is just a hobby. I actually eat everything I photograph and I wasn't willing to pick marbles out of the bottom of my soup nor was I willing to use a cup of soup as a "model" only to discard after its photo shoot.

So here I present to you a not so pretty, but amazingly delicious soup.

Oyster and Wild Rice Bisque
Adapted from Cooking Light December 2008

Yield

8 servings (serving size: about 3/4 cup) - only about four normal size servings, I highly recommend doubling this recipe. If you don't you will wish you did after your first taste.

Ingredients
  • 2 bacon slices, chopped
  • 2 cups chopped onion (about 2 medium)
  • 2 cups shucked oysters, undrained
  • 1 cup clam juice
  • 1 tablespoon all-purpose flour
  • 1 cup fat-free, less-sodium chicken broth
  • 1 bay leaf
  • 1 1/2 cups cooked wild rice
  • 1 1/4 cups whole milk
  • 3 tablespoons half-and-half
  • 1/2 teaspoon kosher salt
  • 1/4 teaspoon freshly ground black pepper
  • Chopped fresh flat-leaf parsley (optional)
Preparation

1. Cook bacon in a large, heavy saucepan over medium-low heat 6 minutes or until crisp. Stir in onion; cover and cook 8 minutes or until the onion is tender, stirring occasionally. Be careful to not let the onions burn while the pot is covered. They will burn much quicker under a closed lid than normal.

2. Strain oysters through a sieve over a bowl. Reserve oysters; add oyster liquid to pan. Combine clam juice and flour in a small bowl; stir with a whisk until smooth. Add clam juice mixture, broth, and bay leaf to pan. Increase heat to medium-high. Bring mixture to a boil; cook until reduced to 2 cups (about 6 minutes).

3. Reduce heat to low. Discard bay leaf. Stir in rice, milk, half-and-half, salt, and pepper.

Cover and simmer 10 minutes. Stir in reserved oysters; cook 5 minutes or until edges of oysters curl.

Sprinkle with chopped fresh parsley, if desired.

This soup was amazing. Probably (get ready for a very bold statement) one of the best things I have ever cooked. It was surprisingly light for a bisque and didn't leave you with a heavy feeling like most cream soups can do. I also don't think that the wild rice is necessary in this recipe. So if you have trouble finding it (like I did) feel free to leave it out. It was only really needed as a filler and if you were to serve this soup as a first course or with bread and a salad you wouldn't need the rice to fill you up anyway. The depth of flavors were amazing and I was able to savor the taste of the oysters in every bite. This was a true treat and I will be making it again very soon.

Saturday, December 6, 2008

Hidden Habit

One thing you might never suspect of me as you read through my gaggle of always homemade, frequently time consuming, and always fresh recipes is that I am a fast food junkie. It is not my proudest quality but it is a fact nonetheless. This entire tendency is tied to my love of French Fries. If you know me in my real life - this is no surprise to you. Chances are you have accompanied me on several visits to these detested restaurants. Most cooks would gag at the idea of driving through a fast food establishment and ordering a bagged meal. I, on the other hand, often crave this experience. Sad - I know - but if feels better getting it off of my chest. I have said it, I have revealed, and I feel liberated! Ok, maybe a little dramatic (but while I am in the mode of revealing things, here is another, I am very dramatic).

Because I do eat fast food on a somewhat regular occasion (slight underestimate) I never want to make sandwiches at home. When cooking I like things that I can't get at a drive-through and I like things that are more "special". My husband is the exact opposite of me. He never joins me in my fast food habit (good for him). He hates it and will always find another alternative to the super in a sack I have chosen for myself. Because of this he does enjoy homemade sandwiches and he loves meals that involve two piece of bread, lettuce, mayo, and meat. It makes him very happy and this meal was no exception. And it was healthy - his favorite characteristic of any meal.

Spicy Chicken Sandwiches with Cilantro-Lime Mayo
Adapted from Cooking Light December 2008

Yeild

4 servings (serving size: 1 sandwich)

Ingredients
  • Mayo:
  • 1/4 cup reduced-fat mayonnaise
  • 2 tablespoons chopped fresh cilantro
  • 1 teaspoon fresh lime juice
  • 1 garlic clove, minced

    Chicken:
  • 1/4 cup egg substitute
  • 3 tablespoons hot sauce (such as Tabasco)
  • 1 teaspoon dried oregano
  • 1/2 teaspoon salt
  • 2 (6-ounce) skinless, boneless chicken breast halves
  • 4 1/2 ounces baked tortilla chips (about 6 cups)
  • 2 tablespoons olive oil

    Remaining ingredients:
  • 4 (2-ounce) Wheat Kaiser Rolls
  • 12 (1/8-inch-thick) red onion slices
  • 4 lettuce leaves
Preparation

1. To prepare mayo, combine the first 4 ingredients.

2. To prepare chicken, combine egg substitute, hot sauce, oregano, and salt in a large zip-top plastic bag. ( I put in a dish then poured into a zip lock bag so I could mix more easily)

Cut chicken breast halves in half horizontally to form 4 cutlets. Add chicken to bag; seal. Marinate in refrigerator 2 hours or up to 8 hours, turning bag occasionally.

3. Place tortilla chips in a food processor;

process 1 minute or until ground.

Place ground chips in a shallow dish.

4. Working with one cutlet at a time, remove chicken from marinade, allowing excess to drip off. Coat chicken completely in chips.

Set aside. Repeat procedure with remaining chicken and chips.

5. Heat a large nonstick skillet over medium heat. Add olive oil to pan, swirling to coat. Add chicken to pan; cook 3 minutes on each side or until browned and done.

Spread mayo evenly over cut sides of rolls. Layer bottom half of each roll with 3 onion slices, 1 lettuce leaf, and 1 chicken cutlet; top with top halves of rolls.


I wasn't sure how the baked tortilla chips would taste on the chicken. I was pleasantly surprised. It created a deep-fried-like crunch with much less fat. It didn't taste like tortilla chips at all. I think this would make a delicious coating for shrimp as well. This meal was very easy and definitely a week night achievable meal.