Sunday, May 31, 2009

Mobile Morning Muffins

We had two short-stay house guests this weekend. They were only here from about 11pm on Friday night until 9am on Saturday morning. With the majority of their stay spent sleeping, I only had a few hours to do something special for them. I knew they would be rushing out of the house on Saturday morning as they headed to their next destination so I decided to make a breakfast that was easy to grab and go.

Healthy Banana-Blueberry Muffins
From Martha Stewart Everyday Food

Ingredients
  • 1 cup whole-wheat flour (spooned and leveled)
  • 3/4 cup all-purpose flour (spooned and leveled)
  • 1/4 cup wheat germ
  • 1 teaspoon baking soda
  • 1/2 teaspoon salt
  • 1/2 cup (1 stick) unsalted butter, room temperature
  • 1/3 cup granulated sugar
  • 1/3 cup packed light-brown sugar
  • 2 large eggs
  • 2 ripe bananas
  • 1/3 cup reduced-fat (2 percent) milk
  • 1 teaspoon pure vanilla extract
  • 1 cup frozen blueberries
Directions

Preheat oven to 375 degrees. Line a 12-cup muffin pan with paper liners. In a bowl, whisk together flours, wheat germ, baking soda, and salt.

In a large bowl, beat butter and sugars

with a mixer until light and fluffy. Add eggs, one at a time, beating well after each addition.

In another bowl, mash bananas with a fork (you should have 3/4 cup);

stir in milk and vanilla.

With mixer on low, alternately add flour mixture and banana mixture to butter mixture,

beginning and ending with flour mixture; mix just until combined. Fold in frozen blueberries.

Divide batter among muffin cups.

Bake until a toothpick inserted in the center of a muffin comes out clean, 25 to 28 minutes, rotating pan halfway through. Let cool in pan 10 minutes; transfer muffins to a rack to cool 10 minutes more.

Wednesday, May 27, 2009

Pick a Pepper

One time I ate a pepper off of a bush in my Aunt's garden. I wouldn't advise this culinary exploration - ever. It wasn't tasty, it wasn't pleasant and it was probably the hottest thing I have ever experienced on my tastes buds. I didn't snack on the pepper bush because I was hungry or even because someone dared me. I actually downed the pepper because one of my brothers dared my other brother to do so. And as I often have a tendency to do, I stuck my nose where it didn't belong and involved myself in someone else's business. My Dad has often told me, "Bizzy, your plate is full. Worry about what's on your own plate and don't concern yourself with anyone else's plate." And although I know my dear father was speaking in metaphoric terms he couldn't have been more right in this situation. I should have only worried about my own plate and my plate didn't need to have a burning hot pepper bush on it that night.

Did I mention drinking was involved? And I am not talking about the gallon of milk I had to drink to try to subside the burn.

Mexican Chicken Casserole
Adapted from Cooking Light December 1998

Ingredients
  • 1 cup fat-free, less-sodium chicken broth
  • 1/8 tsp of cayenne pepper
  • 1/8 tsp of salt
  • 1/2 tsp of cumin
  • 1 teaspoon of chili powder
  • 2 (4.5-ounce) cans chopped green chiles, divided
  • 1 3/4 pounds skinned, boned chicken breasts
  • 2 teaspoons olive oil
  • 1 cup chopped onion
  • 1 cup evaporated skim milk
  • 1 cup (4 ounces) shredded Pepper Jack cheese
  • 1/4 cup (2 ounces) tub-style fat free cream cheese
  • 1 (10-ounce) can enchilada sauce
  • 10(6-inch) corn tortillas
  • Cooking spray
  • 1/2 cup (2 ounces) shredded reduced-fat extra-sharp cheddar cheese
Preparation

Combine broth, cayenne, cumin, chili powder, salt and 1 can of chiles in a large skillet; bring to a boil. Add chicken; reduce heat, and simmer 15 minutes or until chicken is done, turning chicken once.

Remove chicken from cooking liquid, reserving cooking liquid; cool chicken. Shred meat with two forks, and set aside.

Preheat oven to 350°.

Heat oil in a large nonstick skillet over medium-high heat. Add 1 can of chiles and onion;

sauté 3 minutes or until soft. Add reserved cooking liquid, milk, Pepper Jack, cream cheese, and enchilada sauce;

stir well. Stir in shredded chicken; cook 2 minutes. Remove from heat.

Place 4 tortillas in the bottom of a 2-quart casserole coated with cooking spray.

Spoon 2 cups chicken mixture over tortillas.

Repeat layers twice, ending with chicken mixture. Sprinkle with cheddar cheese.

Bake at 350° for 30 minutes or until thoroughly heated. Let stand 10 minutes before serving.


After reading the reviews of the original recipe online I decided to doctor it up a bit. Several of the reviewers stated that the casserole could have used a little more flavor so I added the spices into the broth in which the chicken is cooked. This was very good but I found that the tortillas broke apart/dissolved during cooking. Next time I make this I will toast the tortillas first to give them a better shot at survival during the baking process.

Sunday, May 24, 2009

Dining Al Fresco

We are finally moved in to our new condo and officially moved out of our old one. We didn't spread our wings too wide however. We only moved downstairs. Considering the rushed situation, we decided we would rent another unit in the same building. We are in love with our building, the amenities, the location and the convenience - it seemed like a natural choice. Our new unit is much like our old with a few downfalls. It is has one less room, no vaulted ceilings and is on the first floor. For the first time we have had to deal with the sounds of our neighbors above. The old unit was on the top floor and we were spoiled with the silence.

There is one thing we have in the new first floor condo that we didn't have before that is very exciting. We have a small patio that looks out onto a courtyard. It is really nice to have the opportunity to walk out and get some fresh air. We have only been settled for two days and so far we have eaten out on the patio as many times. The weather has been awesome this weekend and we have really enjoyed dining on our new bistro set in the fresh air!

Summer Vegetable and Chicken Hash
Adapted from Martha Stewart Living June 2009

1 1/2 boneless, skinless chicken breasts, cut into 3/4 inch cubes
1 1/2 tablespoons extra-virgin olive oil
12 ounces small red potatoes
2 cups fresh corn kernels (about 2 ears)
3 scallions, thinly sliced
1/2 jalepeno chile, stem, ribs and seeds removed, minced
1 cup yellow cherry tomatoes, halved
1/2 cup low-sodium chicken stock
Salt
Pepper
1/4 teaspoon Cajun seasoning
1 teaspoon dried Oregon


1. Heat a 12-inch nonstick skillet over high heat. Add 1/2 tablespoon of olive oil to the pan and heat. Add chicken. Season chicken with salt and pepper to taste and 1/4 teaspoon Cajun seasoning. Cook, stirring occasionally, until golden brown, about 4 minutes; transfer to a bowl.

2. Add 2 teaspoons oil and the potatoes to skillet. Cook, stirring occasionally, until golden brown, about 8 minutes; transfer to a small bowl. Place the bowl of potatoes in the microwave for 3 minutes to finish cooking.

3. Add remaining teaspoon oil, the corn, scallions, and the jalepeno to skillet,

and cook, stirring occasionally, until corn turns dark brown in spots, about 2 minutes. Add tomatoes,
and cook until skins just begin to soften, about 1 minute. Add stock, 1 teaspoon of salt, 1/8 teaspoon of pepper, and reserved chicken; bring to a boil. Fold in reserved potatoes, and sprinkle with Oregeno.

Saturday, May 23, 2009

Digital Dieting

I am trying to lose a little weight and shape up heading into the summer season. The next few months are packed with parties, weddings, showers and several other occasions in which sporting a bathing suit is required. It is a crucial time to kick the exercising and eating right into gear. My past experiences show that the best way to do this is with a weight loss buddy. It is so helpful to have someone to work out with as motivation and even more important to have someone to feel guilty around when you chose a hamburger over a turkey sandwich for lunch.

When I married Forrest I thought it was the perfect opportunity to have a live in weight loss buddy. He would always be around to see my food choices and accompany me to the gym. Although the workout partner aspect fared well for us (he goes to the gym with me every time I ask him to), he isn't so great at making me feel guilty about poor dining choices. He loves me too much. If I tell him I want a Happy Meal instead of a salad for dinner he answers back, "Eat what you want, B. I just want you to be happy." Sweet, I know - but not exactly what you need when looking for someone to riddle you with guilt for your decision.

With Forrest eliminated as my choice for weight loss buddy I decided to pair up with my Best Friend Amanda. She has an upcoming wedding and seemed like the next obvious choice. There was one big problem with this pick - we live 1000 miles away from each other. But we figured it wasn't anything that technology couldn't solve. If you read anything about losing weight several professionals will suggest keeping a food journal. It is a great way to chronicle what you are eating, realize how much you are eating, and use it as a tool to self correct what you eat in the future. Amanda and I decided we would use the Internet to share our food journals with each other as a motivator to not eat so much. We agreed to email each other everything we eat during the day in addition to logging exercise time in the emails.

Below are my first two emails to Amanda:

2 pieces of pizza: thin crust, picked off the pepperonis, didn't eat the crust....did you forget I ate pizza yet?

30 minutes of cardio: gym was too hot for 45 minutes, finished my book early, ran out of water......did you forget I only exercised for 30 minutes yet?

Below is her first email:

1 bowl of whole grain cheerios

After this email I felt really guilty. She was going to kick my butt. Then came her second email, written to me from a Mexican themed couples shower she attended:

About 287 chips with salsa

My reply:

At least you didn't eat 300, way to show restraint!

Maybe we have some work to do...........................

Spicy Braised Clams with Sausage and Corn
Adapted from Cooking Light June 2009

Yield

4 servings

Ingredients
  • 1 teaspoon olive oil
  • 8 ounces Salvadorian Chorizo sausage
  • 3 garlic cloves, thinly sliced
  • 1 thinly sliced seeded jalapeño pepper
  • 1/2 cup dry white wine
  • 3 cups chopped fresh plum tomato (about 4 tomatoes)
  • 2 tablespoons chopped fresh oregano
  • 2 tablespoons chopped fresh basil, divided
  • 1/8 teaspoon kosher salt
  • 1/2 teaspoon freshly ground black pepper
  • 1 1/2 cups fresh corn kernels (about 2 ears)
  • 1 1/2 pounds littleneck clams
Preparation

1. Heat oil in a large Dutch oven over medium heat. Remove casings from sausage. Add sausage to pan; cook 4 minutes, stirring to crumble. Add garlic and jalapeño;

cook 1 minute, stirring frequently. Add wine; cook 2 minutes or until liquid almost evaporates, scraping pan to loosen browned bits. Stir in tomato, oregano, 1 tablespoon basil, salt, and black pepper; bring mixture to a simmer.

Cover and cook 10 minutes, stirring occasionally. Stir in corn;

cover and cook 2 minutes.

2. Increase heat to medium-high; stir in clams.

Cover and cook 8 minutes or until clams open; discard any unopened shells. Divide mixture evenly among 4 bowls; sprinkle with remaining 1 tablespoon basil.

Thursday, May 14, 2009

Nesting

I know I have been neglecting my blog. The truth is that life has given me a swift punch in the stomach recently. Things have been so crazy around here. Our landlord called and said he needed to break our lease because his wife was pregnant and they needed to move back into our condo before she was due. I didn't want anything to do with a pregnant lady living in a cardboard box so we quickly started looking for a new place to live. A couple days into the search my mom landed in the hospital. She is OK, but it was quite a scare nonetheless. Shortly after that drama we had to travel out of town for my little brother's college graduation, then my sister came in town for work and stayed with us and now Forrest is headed out of town for his little brother's college graduation. I will move as much as I can over the weekend in his absence and when he returns we will hustle to get the big heavy furniture out of the house utilizing the muscles of he and his friends. I won't be in the kitchen until at least the end of next week because as soon as I post this recipe I am starting to pack my pots into boxes for the move to the new place that will be sans electricity until then. So please be patient. I promise to return to the kitchen and this blog like gang busters!

And to hold you over I have decided to present a fitting recipe to help celebrate our soon to be new "nest"!

Potato Nests with Sour Cream and Smoked Salmon
Adapted from All You 2006

Yield

8 Servings

Ingredients
  • 1 1/2 pounds large russet potatoes (about 2 large)
  • 1/4 cup thinly sliced smoked salmon (2 oz.), plus a small amount for garnish
  • 1 tablespoon grated lemon peel
  • 3/4 cup sour cream
  • 1/2 teaspoon salt
  • Pinch black pepper
  • Small parsley leaves
Preparation

In a large saucepan, bring unpeeled potatoes and enough cold water to cover to a boil over high heat. Reduce heat, cover and simmer potatoes until just cooked, about 25 minutes.

Drain potatoes, let cool and then refrigerate for at least 1 hour, until cold.

Meanwhile, pulse smoked salmon and lemon peel in a food processor, scraping down bowl.

Add sour cream and process until combined.

Refrigerate, covered, until ready to serve.

Preheat oven to 425°F. Lightly grease 32 mini-muffin-tin cups. Peel and coarsely grate potatoes.

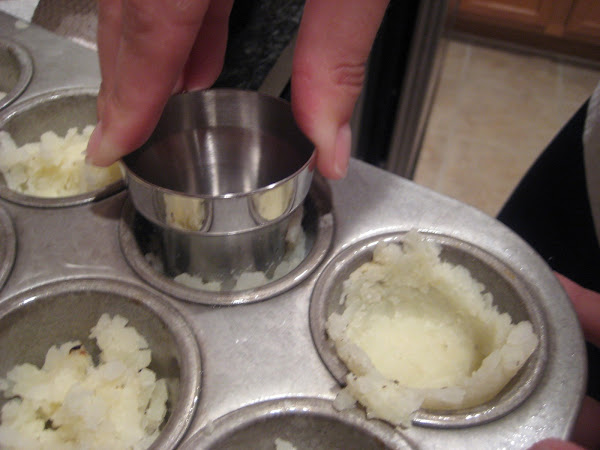
Gently toss potatoes with salt and pepper in a bowl. Place about 1 heaping Tbsp. potato mixture into each muffin cup

and press against bottom and up sides (I used the top of a cocktail shaker to form the mixture into the bottom of the tins), allowing some mixture to extend above rim. (Do not spread mixture too thin or holes will form while baking.)

Bake potato nests until edges are dark golden, about 20 minutes. The original recipe recommended baking them longer. And although my oven is pretty true to recipe timing, I found my nest to appear a little overdone. They didn't taste bad, but they looked a little dark so I decreased the cooking time in this recipe to 20 minutes.

Cool nests in pans for 10 minutes. (Nests may be made up to 4 hours ahead, and I even made mine the night before and stored in an air tight container until the next day.)

Preheat oven to 375°F. Place potato nests on a clean, large baking sheet and bake until heated through and crisp, 6 to 8 minutes. Transfer potato nests to a platter. Using a small spoon, dollop about 1 tsp. sour cream mixture into each potato nest

and top each with a tiny strip of smoked salmon and a parsley leaf. Serve right away.

Tuesday, May 5, 2009

Remembering Rodents

Anytime I see a chocolate chip cookie it brings to mind my favorite childhood book, If You Give a Mouse a Cookie by Laura Joffe Numeroff. I can remember asking my older siblings and my mom to read this book to me over and over again. The book outlines a string of events kicked off my feeding a mouse a chocolate chip cookie and I recall finding it very funny. It teaches cause and effect relationships and the illustrations are very entertaining. It is really cute and quirky and I highly recommend it to anyone with small children.

Ultimate Chocolate Chip Cookies
Adapted from Southern Living April 2005

Yield

Makes about 5 dozen

Ingredients
  • 3/4 cup butter, softened
  • 3/4 cup granulated sugar
  • 3/4 cup firmly packed dark brown sugar
  • 2 large eggs
  • 1 1/2 teaspoons Mexican vanilla extract
  • 2 1/4 cups plus 2 tablespoons all-purpose flour
  • 1 teaspoon baking soda
  • 3/4 teaspoon salt
  • 1 (12-ounce) package Ghirardelli semisweet chocolate morsels
Preparation

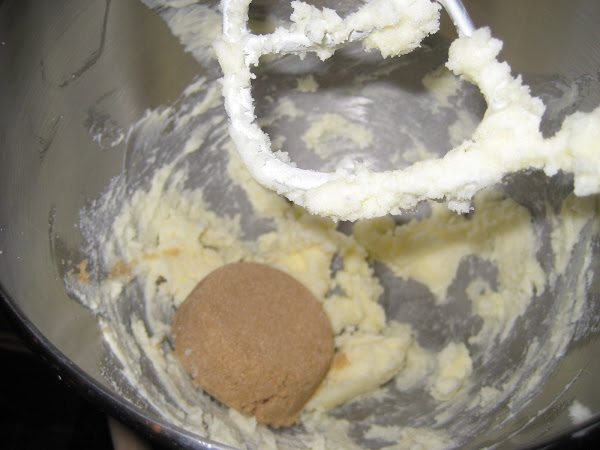
Beat butter with white sugar at medium speed with an electric mixer until blended then add brown sugar

and beat with an electric mixer until creamy. Add eggs and vanilla,

beating until blended.

Combine flour, soda, and salt in a small bowl; gradually add to butter mixture, beating well. Stir in morsels.

Drop by tablespoonfuls onto lightly greased baking sheets.

Bake at 350° for 8 to 14 minutes (I baked them 12 minutes) or until desired degree of doneness. They will harden after removing from oven so don't bake too long. Remove to wire racks to cool completely. Store in an air tight container for up to a week.

Saturday, May 2, 2009

Paralysis Pear

One morning during the summer between my sophomore and junior year of college I woke up and followed my routine like every other morning. I stumbled out of bed and headed straight to the bathroom to brush my teeth and wash my face. As I washed my face I noticed that I kept getting soap in my eye. This seemed strange - face washing isn't the most complicated of activities and I couldn't believe that I was messing it up. I looked in the mirror after I was done and noticed that my left eye seemed to be a little droopy. I called my mom and explained to her the weird occurrence. She suggested that I must be over-tired and should get some more rest. I laid on the couch in the dark for the next few hours and watched TV. As my roommates arrived home for the day from their summer classes I was excited to have some company. I jumped up from the couch to greet them. When they walked through the door my welcome was returned with looks of horror from the both of them. I knew immediately something was wrong. They hurried toward me and asked what had happened to my face. Not sure of the answer, I ran into the bathroom to get a look at what they had seen. The entire left side of my face was drooping; I looked as if I had suffered a stroke. I called my mom back and told her of the negative progress. She recommended I see the doctor as soon as possible.

I made an emergency appointment at the campus infirmary and headed right over. When I walked into the building the nurses seemed concerned. Their reactions did little to calm my nerves. At this point I was sure I had suffered a stroke. I wasn't aware of any other disease associated with facial paralysis and I was convinced I was experiencing facial paralysis. The not- -so-subtle nurses settled me into the tiny exam room to wait anxiously for the doctor. Shortly after he entered the room and introduced himself he started to make some strange requests. He wanted me to stick out my tongue and raise my eyebrows. I complied and after performing these two silly acts he stated very matter of fact that I had Bell's Palsy. "What? Come again? I have what?", I retorted. He explained that Bell's palsy is a paralysis of cranial nerve VII (the facial nerve) resulting in inability to control facial muscles on the affected side. There is no known specific cause, recovery is spontaneous and the effect of treatment is controversial. GREAT! I was a 19 year-old college female with half of a paralyzed face (Remember Sloth from The Goonies?). This would be a fabulous summer. Some people recover in as few as 10 days. Those people don't have my luck. I recovered in about 3 months and it wasn't the most exciting summer of my life - that's for sure.

The only good thing about the entire situation is that because of the palsy I now love avocados. The first day when I got back from the doctor I was embarrassed to be seen in public. My friends were having avocado salads for lunch and I was welcomed to join them. One problem - I didn't like avocado. However, when faced with the prospect of heading out to find lunch in the heavily populated college town with a paralyzed face trying avocados didn't seem so grim. I tried it and loved it and every time I eat a delicious avocado I am reminded of the terrible circumstances of how I came to know the fruit.

Creole Shrimp Salad served in Avocados
Loosely adapted from Emeril Lagasse

Ingredients
  • 1 (3-ounce) package Shrimp and Crab Boil in a bag, or seasoning
  • 1 lemon, halved
  • Salt
  • 1 1/4 pounds medium shrimp
  • 1/4 cup low fat/light mayonnaise
  • 1 tablespoon fresh lemon juice
  • 1 teaspoon Creole mustard
  • 1 tablespoon minced shallots
  • 1 tablespoon minced fresh parsley leaves
  • 2 tablespoons of sliced green onions
  • 1/4 teaspoon minced garlic
  • Pinch cayenne
  • 3 small Hass avocados
Directions

Bring a medium pot of water to a boil with the crab boil bag, the halved lemon, and 1 teaspoon salt. Let boil for 5 minutes. Add the shrimp and cook at a low boil until pink, 2 minutes.

Remove from the heat and let sit in the water for 3 minutes. Drain and rinse under cold running water. Drain.

When the shrimp are cool enough to handle, peel and discard the shells and heads. Using a paring knife, make a shallow slit down the center of the back of each shrimp and remove the black-gray vein. Refrigerate the shrimp until well chilled, 2 hours.

In a medium bowl, mix together the shrimp, mayonnaise, 1 tablespoon of the lemon juice, the mustard, shallots, parsley, garlic, cayenne, and a pinch of salt.

Mix to coat. Adjust the seasoning, to taste. Cover and refrigerate until ready to serve. (The salad can be refrigerated for up to 1 day.)

Cut each avocado in half lengthwise and remove the seed. Place the Shrimp Salad in the seed cavity and serve.