Showing posts with label Sides. Show all posts

Sunday, September 1, 2013

Trump Card Casserole


My Mom is a school teacher.  And for me as a person who works year round and has little patience for stranger's children, by far the most appealing part of that profession in my opinion is the summers off ;-)  Oddly enough, that is the thorn in my Mother's side.  Although she always welcomes the break from the school year come late May, she is normally going stir crazy two weeks in to her summer break.  She doesn't sit well and after the first few weeks of furiously working her way through stacks of novels as tall as she is, she is normally ready to pull her hair out.  So she basically plays tourist in her own city for the rest of the summer months.  She and one of her other teacher friends attend every NOMA art exhibit, take every French Quarter tour and dine at several local restuarants to keep busy during the days.

On one of her French Quarter excursions she picked up a very "souvenirish" gift for me, but something so neat that I was ecstatic to be the recipient.  It was a deck of playing cards called "Deck 'o Meals, 52 Creole recipes".  The deck of cards had more to offer than just 52 classic creole recipes, the recipes had to fit on one side of a standard playing card so they were all very easy recipes with few ingredients.  I quickly thumbed through them and decided I would be making several of them very soon.  The first one I chose was this zucchini casserole.  I wanted to add it as a side for a weeknight meal, but this was so good that I immediately deemed it Thanksgiving/Christmas dinner worthy.  I made a few changes in the preparation of the recipe, but stuck with the original ingredient list and it was AMAZING!


Zucchini Casserole
Loosely adapted from Creole "Deck 'o Meals" Playing Cards

Ingredients:


  • 2 slices of bacon, cut up
  • 8 oz white button mushrooms, chopped
  • 1/2 cup diced yellow onions
  • dash of garlic salt
  • 3 medium zucchini, grated
  • 1 1/2 cup cracker crumbs (Saltines)
  • 1 egg, beaten
  • 2/3 cup Monterey Jack Cheese, shredded
  • 1/2 cup melted butter
  • 1/4 tsp pepper
  • 1/2 tsp salt

Preparation:

1.  Partly cook bacon slices.  Remove from pan and place aside in large mixing bowl.


 Drain all but 1 Tbs of bacon grease from pan.  Cook the onions and mushrooms in the remaining bacon grease.


2.  Add cooked mushrooms and onions to the bacon.  Combine the remaining ingredients.


Adding cracker crumbs and eggs last.


3.  Bake in a 2 quart casserole dish, un-covered for 40 minutes at 350 degrees.


Click Here for My Printable Recipe

Wednesday, July 3, 2013

Craving Creoles


It is hard to imagine a New Orleans summer being known for anything other than its oppressive heat.  Surely if you aren't a local that is how you would most rapidly associate our summer months.  Shoot, even if you are a local, it is pretty hard to deny this place is hot - really hot!  But I think foodie New Orleanians (aren't all New Orleanians foodies?) have two things to get us through these rough hot months of summer: snowballs and creoles.  Creole tomatoes are the delicacy of the summer months here in New Orleans and it is hard not to be totally addicted to these thick, meaty, juicy, bright red tomatoes.  I don't even really like tomatoes, but I can't get enough of the perfect creoles offered in South Louisiana.  You can find them anywhere from the local supermarkets and roadside stands to your Great Uncle's backyard garden. I don't remember a summer day growing up where my Grannie didn't have at least three creoles resting on her windowsill above her kitchen sink just waiting for their turn in the daily rotation of creole tomato sandwiches or creole tomato salad.

I have been buying a few creole tomatoes each week and finding different ways to incorporate them into our weekly dinners.  I have exhausted the more expected combinations and was thrilled when I came across this recipe.  It advertises this dressing as "tomato's new best friend" and I new immediately which type of tomato would round out this "friendship" perfectly.

Cucumber Basil Buttermilk Dressing
Adapted from Southern Living June 2013


Ingredients

  • 4 cups peeled, seeded, and thinly sliced cucumbers (about 4 large cucumbers)
  • 2 teaspoons table salt
  • 1 1/2 cups Non-Fat Greek yogurt
  • 1 1/2 cups light mayonnaise
  • 2 tablespoons finely grated sweet onion (about 1/2 large onion; do not use juice)
  • 1 tablespoon finely grated garlic (about 3 large garlic cloves)
  • 1/2 cup chopped fresh basil
  • 1/2 cup whole buttermilk
  • 1/4 cup fresh lemon juice
  • 1 tablespoon sugar 
  • 1/2 teaspoon kosher salt
  • 1/2 teaspoon freshly ground pepper 

Preparation


Toss together first 2 ingredients; drain in a colander 30 minutes.


Mix together yogurt and next 9 ingredients using a rubber spatula.


Until well combined.


Stir in cucumbers; let stand 30 minutes.


Cut thick tomato slices and server dressing drenched over the top.  Finish with a sprinkle of fresh basil and cracked black pepper.  Refrigerate dressing for up to 2 days.   This makes a TON of dressing, so halve the recipe if you are only looking to serve this once.


Click Here for My Adapted Printable Recipe

Monday, November 26, 2012

Honey Do!


We have been suffering through a series of sore throats in our house. I have taken to hot tea and honey for relief.  The huge honey jar on my counter left me thinking of other honey uses.  And I know this really seems too easy to be considered a recipe, but it is a nice way to dress up some fresh bread.  I have been known to always balance out my sweet with salty, so enters the sea salt!  Give this one a try, you won't be disappointed.

Salted Honey Butter

Ingredients: 
  • 1 stick of Unsalted Butter, room temperature
  • 1 tablespoon of Grade A Honey
  • 1/4 teaspoon of Sea Salt
Preparation:

1.  Whip the unsalted butter using an electric mixer for about 2 minutes until soft and fluffy.  Make sure the butter is already room temperature, this will help make the whipping process faster.


2.  Add Honey and Salt with the mixer running and whip for another 1 minute until all of the honey is fully incorporated.


 3.  Place whipped butter in a ramekin and top with a sprinkle of sea salt.  Serve at room temperature with fresh bread or cornbread.


Click Here for My Printable Recipe

Wednesday, November 21, 2012

"Make Me" Mushrooms


I know it seems a little late to be posting Thanksgiving recipe ideas, but this one is so easy it won't take much effort to pull off at the 11th hour.  And trust me, this is an amazing recipe.  Four ingredients and about four minutes of prep time to get this sensationally savory side dish (or appetizer, your choice) in the oven.  But if I am in fact too late to get this added to your menu for tomorrow, keep this recipe around - it is huge crowd pleaser!

Feta and Rosemary Stuffed Mushrooms

Ingredients:
  • 1/4 cup of Feta Cheese, crumbled
  • 1 1/2 teaspoons Rosemary, chopped fine
  • 4 medium Portabella mushrooms, sometimes called stuffing caps
  • 2 teaspoons Worcestershire sauce
  • Fresh Cracked Black Pepper
  • Non-Stick cooking spray

Preparation:

1.  Preheat oven to 400 degrees Fahrenheit.

2.  Mix the Feta and Rosemary in a small bowl.


3.  Wipe mushrooms clean with a clean dry dish cloth.  Pull stem from each mushroom and use a spoon to scrape away the mushroom gills. Discard the caps and gills.

4.  Brush the inside and the outside of the caps with Worcestershire sauce using a pastry brush.


Sprinkle the inside of the caps with cracked black pepper.

5.  Divide the Feta and Rosemary mixture evenly among the mushrooms.  Packing the cheese tight inside the mushroom cavity.  Place the stuffed mushrooms on a cookie sheet sprayed with non-stick cooking spray.


6.  Bake the mushrooms for 20 minutes or until the cheese melts and begins to lightly brown.  Serve immediately.


Click Here for My Printable Recipe

Thursday, November 8, 2012

Come out of the Candy Coma


Is everyone ready to detox from all the Halloween candy yet?  I couldn't wait for it to be out of my house.  There is just no need for a huge bucket of candy when two of three people in the household are either a toddler or a Type 1 diabetic!  So glad it is gone.

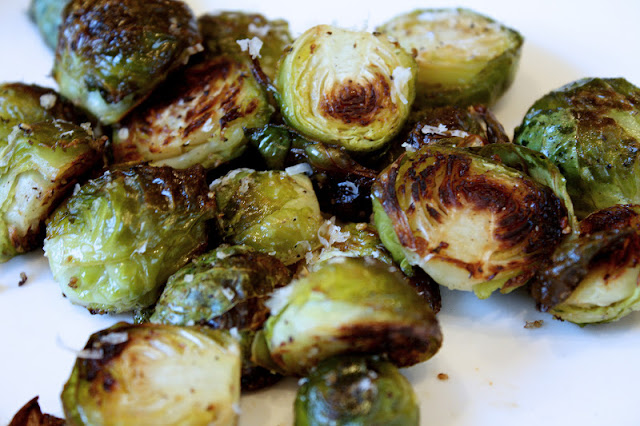
This is the perfect recipe for returning to healthy eating, not to mention probably the last thing your kids want to be served after eating candy for a week straight ;-)  I don't know why brussels sprouts get such a bad rap - these little guys are delicious, and cute too!  This recipe was very simple and used hardly any ingredients.  It was perfect for a weeknight side dish.  But I feel inclined to warn you, roasting these tiny green veggies will stink up your house.  Something awful!  So even though they are delicious, don't add them to your menu when you are having guest over that you need to impress.

Roasted Romano Brussels Sprouts
Adapted from Cooking Light November 2012


Ingredients

  • 3 tablespoons olive oil
  • 1/2 teaspoon sea salt
  • 1/4 teaspoon freshly ground black pepper
  • 2 pounds Brussels sprouts, trimmed and halved lengthwise
  • Cooking spray
  • 1 ounce pecorino Romano cheese, shaved (about 1/3 cup)


Preparation

1. Preheat oven to 425°.
2. Combine olive oil, salt, black pepper, and Brussels sprouts in a medium bowl; toss well to coat.


Divide Brussels sprouts mixture evenly between 2 small roasting pans or jelly-roll pans coated with cooking spray. Bake at 425° for 20 minutes or until Brussels sprouts are browned and crisp-tender, rotating pans after 10 minutes. Remove from oven. Sprinkle Brussels sprouts evenly with cheese. Serve immediately.


Click Here for My Adapted Printable Recipe

Wednesday, August 15, 2012

Strange Seasons


We don't mark our Seasons here in New Orleans using temperature changes.  The truth is that it will be hot (really really hot) for probably three more months in my hometown.  We don't have a true Fall and our Winter is always very mild.   We note season changes using other factors.  Summer into Fall is usually the end of SnoBall Season and the beginning of College Football, we work with what we have ;-)  So even though we won't have to retire our grill anytime soon, I feel like my days for recipes like these are getting numbered.  Especially since this has been the frequent scene around my house:


Grilled Watermelon with Prosciutto and Feta

Adapted from Southern Living August 2012


 Ingredients

  • 3 (1/2-inch-thick) watermelon rounds, quartered
  • 1 tablespoon olive oil
  • Sea salt
  • 4 ounces thinly sliced prosciutto
  • 4 ounces feta, crumbled
  • Fresh basil leaves, chopped
  • 2 teaspoons balsamic vinegar


Preparation

1. Preheat grill to 350° to 400° (medium-high) heat. Brush both sides of each watermelon quarter with olive oil, and season with desired amount of salt. Cut prosciutto into thin strips.
2. Grill watermelon quarters, without grill lid, 2 minutes on each side or until grill marks appear.


3. Transfer watermelon to a serving plate; top with feta, prosciutto strips, and fresh basil. Drizzle watermelon with balsamic. Serve immediately.


Click Here for My Adapted Printable Recipe

Thursday, August 9, 2012

Quite the Quiche !


I just finished telling you in my last post about how I have to have some type of protein in my meals to feel satisfied and here I am following up with another meatless dish.  I love quiche, and so does my husband (don't tell anyone, I think that does something to your manly status).  I have made tons of quiches in the past.  Most of them were packed with meat and Forrest admitted to being partial to those, but he said the caramelized onions in this dish were the star.  I served this for dinner, one big slice along side a piece of grilled andouille.  The presence of the zucchini made this seem like more of a lunch/dinner meal rather than breakfast, but I don't see why it couldn't be served at any time of day.  There are two tips for making this recipe much easier than it seems: caramelize your onions the day before you plan to make the quiche, and use a mandoline to get perfectly uniform and extra thin zucchini slices (I just use a cheap handheld one, nothing fancy).

Zucchini and Caramelized Onion Quiche

Adapted from Cooking Light August 2012


 Ingredients

  • 1/2 (14.1-ounce) package refrigerated pie dough (such as Pillsbury)
  • 1 tablespoon olive oil
  • 4 cups (1/8-inch-thick) slices zucchini
  • 3 garlic cloves, minced
  • 3/4 teaspoon salt, divided
  • 1/2 cup finely chopped Basic Caramelized Onions
  • 1 cup 1% low-fat milk
  • 1 1/2 tablespoons all-purpose flour
  • 1/2 teaspoon freshly ground black pepper
  • 1/4 teaspoon ground red pepper/cayenne 
  • 3 large eggs
  • 2 ounces Parmigiano-Reggiano cheese, grated (about 1/2 cup)


Preparation

1. Caramelize Onions.  Vertically Slice 3 large onions and saute in a pan with 1Tbs of olive oil, 1/2 Tbs of butter and 1/4 teaspoon of salt.


Cook for 1 hour on low heat until the onions are dark brown and caramelized; stirring frequently.


I did this the night before to cut down on the preparation time for the quiche.  3 large onions will cook down to amount to about 1/2 cup of caramelized onions.

2. Preheat oven to 425°.

3. Roll dough into a 12-inch circle. Fit dough into a 10-inch deep-dish pie plate. Fold edges under; flute (as you can tell from my pictures, I am not a good "fluter" - in fact, I am a terrible "fluter"!).


Line dough with foil; arrange pie weights or dried beans on foil.


Bake at 425° for 12 minutes or until edges are golden. Remove weights and foil; bake an additional 2 minutes. Cool on a wire rack.

4. Reduce oven temperature to 375°.

5. Heat a large nonstick skillet over medium-high heat. Add oil to pan; swirl. Add zucchini and garlic; sprinkle with 1/4 teaspoon salt. Sauté 5 minutes or until crisp-tender. Cool slightly.


6. Arrange Basic Caramelized Onions over bottom of crust;


top with zucchini mixture.


Combine remaining 1/2 teaspoon salt, milk, flour, pepper (black and red), eggs, and cheese in a medium bowl, stirring well with a whisk.


Pour milk mixture over zucchini mixture.


 Bake at 375° for 35 minutes or until set. Let stand 10 minutes before serving.


Click Here for My Adapted Printable Recipe

Wednesday, August 1, 2012

Presto Pasta


I find it hard to feel satisfied with meatless meals.  I think it is more mental than anything else.  There are certainly a number of ingredients you can add to a meatless dish in order to fill up your belly, but I always feel deprived if there isn't a single "meat" ingredient.  I was expecting to have the same reaction to this dish, but decided to give it a try anyway since it was a super fast weeknight option.  To my surprise, I was very satisfied with all of the ingredients here.  I didn't miss a thing while enjoying this hearty meatless pasta.  I think the use of fresh pasta was a good choice as it sped up the cooking time and added a special touch to this perfect "few ingredient" dish!

Fettuccine with Tomato-Cream Sauce
Adapted from Cooking Light August 2012

Ingredients

  • 8 ounces uncooked fresh fettuccine
  • 4 quarts boiling water
  • 1/2 teaspoon salt, divided
  • 1 tablespoon olive oil
  • 3 tablespoons coarsely chopped garlic
  • 1 (28-ounce) can whole peeled San Marzano tomatoes, drained and crushed
  • 3 ounces 1/3-less-fat cream cheese
  • 1/4 cup black olives, pitted and sliced
  • 1/4 teaspoon crushed red pepper
  • 1/4 cup small fresh basil leaves
  • 1/2 ounce Parmigiano-Reggiano cheese, shaved


Preparation

1. Cook pasta in 4 quarts boiling water with 1/4 teaspoon salt for 4 minutes or until noodles are almost al dente. Drain pasta through a sieve over a bowl; reserve 1 1/3 cups pasta cooking water.
2. Heat a large skillet over medium-low heat. Add oil to pan; swirl to coat. Add garlic; cook 2 minutes or until very fragrant and tender, stirring occasionally. Stir in remaining 1/4 teaspoon salt and tomatoes; cook 3 minutes, stirring occasionally.


Stir in reserved 1 1/3 cups pasta water; bring to a boil. Add cream cheese; stir until smooth.


Add pasta, olives, and red pepper;


cook 3 minutes or until pasta is al dente, tossing to coat. Divide pasta mixture among 4 shallow bowls; top each serving with 1 tablespoon basil. Divide Parmigiano-Reggiano evenly among servings.


Click Here for My Adapted Printable Recipe

Monday, July 9, 2012

Say that as fast as you can 3 times!


We made a quick weekend trip to one of our favorite sandwich shops in the city, Cochon Butcher to pick up some of their famous Sweet Potato Habanero Hot Sauce for my in-laws.  I have never successfully ventured into "The Butcher" and purchased only the intended items.  I love their meat counter and I always have to indulge in a few of their awesome choices even if I have no planned purpose for them.  During this visit I left with the two bottles of hot sauce I went there to buy, some fresh boudin and two thick slabs of their amazing pancetta.  I had a ton of ideas for incorporating the pancetta into our dinner that night, but most of them involved another trip to the grocery.  I wanted to try to use existing ingredients and this spin on "breakfast for dinner" was the perfect option.  The pancetta was perfectly seasoned and made the best salty, crispy addition to the creamy, cheesy grits!

White Cheddar Pancetta Grits

Ingredients:

  • ¼ pound pancetta, diced
  • 5 packets of instant grits
  • 3 cups of whole milk
  • 2 tablespoons of butter
  • ½ cup of shredded sharp white cheddar cheese
  • 3/4 - 1 teaspoon salt
  • ½  teaspoon cracked black pepper
  • ¼ teaspoon cayenne pepper
  • Fresh parsley

Directions:

1. Fry pancetta in a small skillet that has been coated with cooking spray. 


Once pancetta is crisp, remove from skillet using a slotted spoon and place on a paper towel lined plate to drain.
2.  Empty the contents of 5 packets of instant grits into a microwave safe skillet.  Add milk to the grits and stir to incorporate. 


Whisk in salt, pepper and cayenne.  

3.  Microwave grits on high for 3 minutes.  Remove from microwave and whisk in butter.  


Microwave for another 1 minutes.

4.  Remove grits from microwave and stir in cheese until melted.


5.  Spoon grits into bowl and top with 2 tablespoons of pancetta and fresh parsley.


Click Here for My Printable Recipe

Thursday, June 21, 2012

Who says Summer can't be Comfortable?


It doesn't have to be Fall for me to crave comfort food.  I am ready to eat rich heavy foods anytime of year.  Light summer fare is nice and refreshing and great in the Southern heat, but I can always find a reason to indulge in comfort food no matter what the temperature outside may be.  And my favorite comfort food by far is gooey cheesy baked pasta.  This is a great recipe because it provides the satisfying intensity of the melted cheese and warm pasta, but it utilizes fresh summer veggies for the perfect marriage of seasonal stars.  This is a regular in my household.  It is easy to prepare, super satisfying and loved by all members of my crew - including my 20 month old!

Baked Ziti with Summer Vegetables
Adapted from Cooking Light July 2011

Ingredients

  • 8 ounces uncooked ziti
  • 1 tablespoon olive oil 
  • 2 cups chopped yellow squash 
  • 1 cup chopped zucchini 
  • 1/2 cup chopped onion
  • 2 cups diced tomato; canned and drained (Italian Style)
  • 2 garlic cloves, minced
  • 1 cup (4 ounces) shredded part-skim mozzarella cheese, divided 
  • 1/4 tablespoons dried basil
  • 1/2 teaspoon dried oregano
  • 3/4 teaspoon salt, divided
  • 1/8 teaspoon crushed red pepper
  • 1/4 cup (2 ounces) part-skim ricotta cheese
  • 1 large egg, lightly beaten 
  • Cooking spray 

Preparation

1. Cook pasta according to package directions, omitting salt and fat; drain.

2. Preheat oven to 400°.

3. Heat a large skillet over medium-high heat. Add oil to pan. Add squash, zucchini, and onion; sauté 5 minutes.


 Add tomato and garlic; sauté 3 minutes.


Remove from heat;


stir in pasta, 1/2 cup mozzarella, herbs, 1/2 teaspoon salt, and pepper.


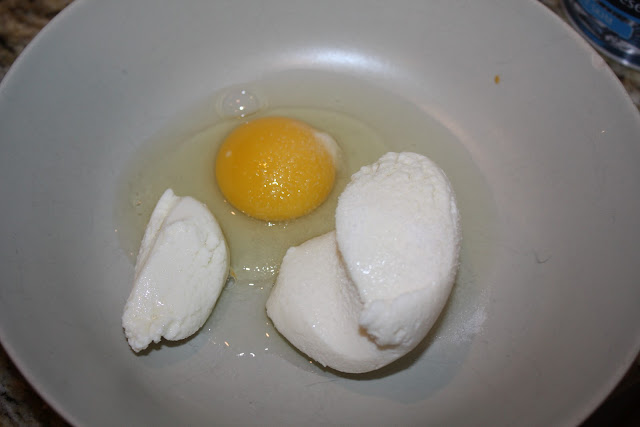
4. Combine ricotta, remaining salt, and egg.


Stir into pasta mixture.


Spoon into an 8-inch square glass or ceramic baking dish coated with cooking spray;


 sprinkle with remaining mozzarella. Bake at 400° for 15 minutes or until bubbly and browned.


Click Here for My Adapted Printable Recipe